Automating Ubuntu 26.04 Installs
This post, like all posts on this site, was written by good old fingers made of meat and bone. That's why it took so long to get out and also why there are typoes and stylistic inconsistencies. It is also the longest post on the whole website. Maybe now I can stop talking about Subiquity for a while.
This is the Hollywood 4K remaster of this blogpost. It is also the writup for my 2026 Linuxfest Northwest talk. The goal of this blogpost is to have all of the information that you need to get a complete Subiquity autobuild setup. The title and URL say 26.04, but this information should be portable across previous and future versions.
In order to get Subiquity autobuilding your system for you, you have to launch the installer ISO in a special manner. You can do this either with heavy network infrastructure or with everything bundled into one ISO (on a flash drive or mounted to a VM).
Network Method
DHCP
The network method begins with getting your system PXE-booted. The exact steps to get a system PXE-booting are going to vary from system to system. It might be called "Network Boot" or "DHCP Boot" in the options. There will probably be an option to accomplish this somewhere in the boot menu on a bare metal machine. To provide an incomplete list of examples:
- For most systems sold as servers, there will be a "Press F12 to PXE Boot" message or something similar in the corner while you are booting up. For example, on Dell systems, this is always F12. On some systems, like SuperMicro baords, you will have to explicitly enable it in the settings and then hit F11.
- For workstation systems, there will sometimes be PXE option in the UEFI/BIOS boot menu. This isn't always the case though and you might need to resort to the flash drive method described later in this post instead. For some systems, like Raspberry Pis, you will need to change the settings from within an already-installed OS, which kind of defeats the whole point of this entire exercise.
- For virtual machines, there will either be an option in the initial configuration or in the in-VM BIOS menu. For libvirt, you just add --pxe to your virt-install command.
On some systems, you will need to disable Secure Boot in order to get the PXE boot option to be visible. But regardless, you will need to disable Secure Boot in order to use PXE booting, since the PXE image that we're going to ship over the network won't be signed. Depending on what you wind up doing to the ISO (more on that later) and how much control your hardware vendor gives you over Secure Boot, you might be able to turn Secure Boot back on at the end. Secure Boot shenanigans are outside the scope of this post, however.
Once your PXE boot ROM is running, it will attempt to get a DHCP lease. This DHCP lease will need to include the DHCP options 66 and 67, which point to a server and a filename, respectively. Just like getting into a PXE ROM in the first, place, there is a unique way to set this information for each DHCP server out there.
- ISC DHCPD calls these options next-server and filename.
- ISC Kea adds these as "option-data" dictionaries with the "names" of tftp-server-name and boot-file-name.
- In OPNSense ISC DHCPv4, these are nested under the Network booting dropdown.
I wish that I could magically know what hardware and DHCPD you, the reader, are running. However this is impossible for me to know. So aside from these few examples, the best that I can offer you is good luck with trying to find this information for your particular environment. I have been told that the Windows DHCP server of a relatively recent version requires you to manually enter the hexadecimal notation of the options, which is downright terrifying. I hope that you don't run into that.
The server that your PXE ROM reaches out to over the network will be a TFTP server, and the filename that it requests will be the path to a PXE image. This PXE image isn't the Ubuntu ISO. We'll cover what file this setting should be set to in a couple of sections. You need the file server before you can serve the files.
The File Server
Your fileserver is the system that will run both an HTTP daemon and a TFTP daemon. In this example I'll be showing you how to accomplish this on Ubuntu, since I assume that if you are autobuilding Ubuntu then you likely have some Ubuntu infrastructure.
For keeping things organized, I like to have one directory to serve as the root for both my HTTP and TFTP. This makes it easier to think about where the files are stored. I like to use /var/pxe/. You can technically have these daemons running on different paths or different machines. However, doing so makes things more confusing (in my opinion) so I always compress the functions into one system.
To get the TFTPD on the system, we'll install the package:
sudo apt install tftpd-hpa
The name TFPTD stands for "Trivial File Transfer Protocol Daemon". The Trivial File Transfer Protocol is an old ptorocol from 81. It features no encryption or security of any kind. We will be using this protocol to transfer an image over the network to boot a machine. Perhaps you can see the security problem with this design. For this reason, some newer systems support something called "HTTP Boot", but I can't afford anything that supports that so I won't be covering it here. The HPA in the package name refers to the initials of Hans Peter Anvin. For some reason, writing systems software compels people to use their initials as a moniker (HPA, RMS, ESR, DHH, etc).
Once you've got the TFPTD installed on your machine, you have to configure it since the default config just won't do. The config file is located at /etc/default/tftpd-hpa. Here is what mine looks like:
TFTP_USERNAME="tftp"
TFTP_DIRECTORY="/var/pxe"
TFTP_ADDRESS=":69"
TFTP_OPTIONS="--secure"
The username and address above are left as the default. The address in question is the well-known port for TFTP. It runs on UDP, not TCP like you might expect from a file transfer protocol. The --secure might give you a sense of security, but it really just means that the requested file will be the relative path. If you wanted to get the file /var/pxe/foobar from a TFTPD server with --secure set, you'd only need to request /foobar. This is considered "more secure" because you aren't revealing information about the overall structure of your file server to anybody on your network sniffing DHCP packets. Without this option, the user would need to request the file /var/pxe/foobar, which in this context is considered "less secure". You can also see here that this is where we configure the root to be the PXE root mentioned earlier.
This default file is sourced by the systemd tftpd-hpa.service, which is actually not a systemd.service file and is instead a init script stored at /etc/init.d/tftpd-hpa. The protocol and the daemon that we are using here are both really old and haven't been touched in ages.
Once you've got the above changes made, restart the service:
sudo systemctl restart tftpd-hpa
I've found it very easy to accidentally typo the service name. For this reason I recommend copy-pasting it.
This TFTP daemon is only going to serve the initial PXE image, which is going to be the boot loader GRUB (more on that in the next section). There are multiple reasons that just GRUB is served instead of the whole entire Ubuntu ISO:
- It's UDP so if you miss a packet you're hosed. You might not notice this hose-age at first on a big ISO where not every bit matters.
- TFTP does actually implement checking, but since it does this one layer up in the OSI burrito, it reduces performance and results in really low bandwidth caps.
- The TFTP boot ROM can't access your whole RAM so it doesn't have enough space to hold the whole entire ISO. GRUB is small enough to fit.
- Even if the ROM could hold more, the protocol itself is limited to 32MB. A later ammendment allows it to go up to 4GB. Some nonstandard implementations can reach unlimited file sizes. You can't really rely on either of these later options being implemented. Ubuntu ISOs are now 6GB in size.
Overall TFTP is not a great protocol. We're stuck with it the same way we're stuck with Ctrl+C to stop a program in the terminal. It's just a vestige of how computers used to be. It's like a tailbone or appendix.
In addition to the TFTP daemon, you're going to need an HTTP daemon. There are a bazillion HTTPDs out there and if you're the type of person to read this blogpost then you probably already have a favorite picked out. I like Nginx so I'll show you how to set things up with that:
sudo apt install nginx
And once it's installed you'll want to create a new file in /etc/nginx/sites-enabled/ called pxe or something like that.
server {
        listen 80;
        server_name actually_put_something_here;
        location / {
                root /var/pxe/;
        }
}
We're just setting the root to the same as what it is for the TFTPD.
If you're running multiple server{} blocks on your
webserver, you'll need to put something identifying in the
server_name field so that SNI can pick it up.
Otherwise, you can give it an underscore to just be the default.
HTTPS on port 443 could be used here. With a valid SSL setup, this is possible. I have done it before. I don't see the point. Since the server is being pointed to an HTTP URL by a file that is served over TFTP, there is no question as to what content the user is requesting, so there is no concern about user privacy. HTTPS in this case would only serve to protect the data in transit from being tampered with. However, since a malicious attacker could just tamper with the file that points GRUB to the URL and point GRUB to a different URL instead, this seems to me like a moot point. If you can think of a reason why there is an actual value-add for enabling HTTPS here, let me know (contact button at the bottom of this post).
After making the above change, reload Nginx with:
systemctl reload nginx
You can of course use whatever HTTPD you want to use. If you have religious objections to Nginx, then just imagine that I used whatever example you prefer above.
Once you've got the file-serving daemons up and running on your machine, you can test that they are actually working. Place a test file at /var/pxe/foobar with whatever contents you want. Then, from another machine on the network, check out the file:
# Install clients for TFTP and HTTP
$ sudo apt install tftp-hpa curl

# Test TFTP
$ tftp PXE_SERVER_ADDRESS -c get foobar
$ cat foobar
I like to move it move it

# Test HTTP
$ curl http://PXE_SERVER_ADDRESS/foobar
I like to move it move it
You will obviously need to open up 69/UDP and 80/TCP on your file server's firewall in order to get the above working. If you need to troubleshoot TFTP, you can crank up the logging verbosity by adding the --verbose flag to the options in the /etc/default/tftpd-hpa file and restarting the service.
The Files
Once the file server is serving files on both protocols, you need to actually put the files in place that are needed. You are going to need a lot of files in total:
- Subiquity autobuild config
- Ubuntu ISO
- Initial ramdisk
- Linux Kernel
- GRUB image
- Another GRUB image
- GRUB libraries
- GRUB config file
There's a lot here and some of it is a whole lot of fun to get. I'll cover the Subiquity config further down on this page, but other than that let's start at the top.
The Ubuntu ISO
Just use the stock Ubuntu server ISO. Click the green "Download" button on this page. Or from your commandline:
mkdir -p /var/pxe/isos/26.04/
curl https://releases.ubuntu.com/26.04/ubuntu-26.04-live-server-amd64.iso > /var/pxe/isos/26.04/server-amd64.iso
As time passes after I publish this blogpost, new sub-versions of the ISO will be available for download. If you're copypasting in the year 2030, it would be a good idea to get a fresh link from the above-linked page instead of just using the above curl line.
It is important that, if you are doing this network method, you use the server ISO. This is for several reasons:
- The Ubuntu server ISO is (at the time of writing) 3 GiB, while the Ubuntu desktop ISO is a whopping 6 GiB. Transferring this extra data over the network takes extra time.
- If the hardware or VM that you're trying to autobuild only has 4GB of RAM, the server ISO will just barely squeeze on while the desktop ISO will be too big.
- The desktop ISO also needs to have enough RAM to boot up a whole desktop environment in addition to storing the entire ISO. As a result, you actually need more like 16GB of RAM to netboot the desktop ISO. If you try to netboot the desktop ISO on something lower like 8GB of RAM, it will panic because it runs out of memory very quickly.
It's all going to be automated anyways, so there's no reason to netboot the desktop ISO even though you technically could. Maybe it would make sense if you have a junior admin who is deathly allergic to both automation and TUIs, but if you're reading this blogpost then you're not that type of person. Perhaps you need to install Ubuntu desktop on a workstation that has no functioning USB ports but can PXE boot. Even if this imaginary situation were the case, you could do it easily by specially configuring Subiquity's user-data file and using the server ISO, as we will see later in this blogpost.
The Kernel and Ramdisk
Once you pick a boot option in GRUB, it is going to fetch a kernel and ramdisk over the network.
You need to pull the Linux kernel and initial ramdisk out of the ISO. The reason for this is because the kernel and initrd that are packaged inside of the ISO are special. They have the unique ability to pull the ISO over the network and boot it. Not every kernel and ramdisk has this functionality. If you were to copy the kernel and ramdisk from your computer, they wouldn't work. If you were to pull them out of the ISO for a different distribution, they wouldn't work there either. They ahve to come out of the stock Ubuntu ISO. You also need to use the right ramdisk for the ISO that you're booting. The ramdisk from the desktop installer won't work for the server ISO, and vice versa.
Back in 2020, mwhudson (top Subiquity dude) said:
We will be publishing the kernel and initrd so you don’t have to fish them out of the ISO.
But it's been 6 years and I've never been able to find them published separately. Maybe I'm not looking well enough. As of now, you have to fish them out of the ISO. This is pretty straightforward to do, especially since you already downloaded the ISO to your fileserver in the previous step:
mkdir -p /var/pxe/isos/26.04/casper/
mount /var/pxe/isos/26.04/server-amd64.iso /mnt/
cp /mnt/casper/initrd /var/pxe/isos/26.04/casper/
cp /mnt/casper/vmlinuz /var/pxe/isos/26.04/casper/
That's all you have to do. These files could technically live anywhere in the /var/pxe/ tree, but I like to keep them per-version and in a casper directory, just for my own sanity and organization. I've noticed that sometimes there are incompatibilites between major versions. For safety, always pull out a fresh kernel and ramdisk whenever you're booting a fresh ISO.
Canonical has not published an easy-to-find writeup on exactly what they change inside of the kernel/ramdisk combo that let it netboot the ISO. If you find yourself needing to compile a special kernel/ramdisk for your netboots, you'll have to dissect the CD Image CI. That's probably the code located in this launchpad repo, but I'm only guessing here.
The GRUB Files
I mentioned above that you'll need two GRUB images. One will be for legacy BIOS systems and the other for modern UEFI systems. Legacy BIOS PXE ROMs don't support the larger UEFI PXE image. I haven't found a modern UEFI PXE ROM that supports the legacy BIOS PXE instructions. As a result of this two-way incompatibility, you need two images.
I will show you how to compile these images yourself. You could download the very old signed UEFI GRUB image from Canonical which might work with Secure Boot if you desperately need it. I have not tested this so I cannot confirm that it works w/ Secure Boot. You also won't be able to set the GRUB prefix or custom modules. This image hasn't been updated in 6 years and Canonical has stopped generating new versions of it. It will also be totally useless if you are ever trying to do this on RISC-V or ARM.
To generate the GRUB images, you'll need to first download some packages:
sudo apt install grub-pc grub-efi-amd64-signed
Then you'll run these commands to generate the two GRUB images:
grub-mkimage -d /usr/lib/grub/i386-pc/ -O i386-pc-pxe -o ./grub_i386.pxe -p '/grub' pxe tftp
grub-mkimage -d /usr/lib/grub/x86_64-efi/ -O ×86_64-efi -o ./grub_x64.pxe -p '/grub' efinet tftp
The grub-mkimage command is, as the name would imply, the command that makes a GRUB image. The options that we pass it are important:
- -d: Tells grub-mkimage where on the disk it should look for images and modules to compile the GRUB image.
- -O: Specifies the output format. There are many
examples that you can see in
man grub-mkimagebut the options that we are setting here are for legacy BIOS PXE and modern EFI, respectively. - -o: Sets the output filepath. This isn't written anywhere inside of the GRUB image, so these files are portable and can be moved around to wherever you need them to live. They don't have to be generated in place.
- -p: Is the GRUB prefix directory. GRUB will look at the DHCP lease to get the TFTP information and request all of its files from underneath this prefix directory. In the example here, these files will all live under /var/pxe/grub/. Doing this keeps things organized.
- [pxe|efinet] tftp: are the modules that we want compiled into the GRUB image. These two are the necessary ones for GRUB to get all the rest of its modules over the network. You could add additional modules to the image itself to keep GRUB from needing to pull more from the network. However, this would increase the size of your PXE image (possibly past the limits for TFTP or your PXE ROM). For this reason, I prefer to keep the GRUB image as small as possible and only include the absolutely necessary modules. The rest can get dynamically loaded once GRUB is running.
These two image files, along with the directories at /usr/lib/grub/[i386-pc|x86_64-efi]/ need to be copied into the GRUB prefix directory:
cp grub_i386.pxe /var/pxe/grub/
cp grub_x64.pxe /var/pxe/grub/
cp -r /usr/lib/grub/i386-pc /var/pxe/grub/
cp -r /usr/lib/grub/x86_64-efi /var/pxe/grub/
Additionally, it is worth mentioning that these GRUB images only need to be generated the one time. On some of my environments, I'm still running GRUB images that were generated on 20.04, but they are able to boot 26.04 systems without issue. Hopefully, the only time you'll need to generate new images are when you get a new architecture (RISC architecture is going to change everything) or when the sequel to UEFI comes out.
The last file that you'll need before we get to Subiquity's config is the grub.cfg. The options that you set here will give you the initial boot menu that you can use to select from any number of options. I keep separate Subiquity configs for different types of servers and then select which one will be built. Here's an example of what my GRUB screen looks like (with sensitive names redacted):
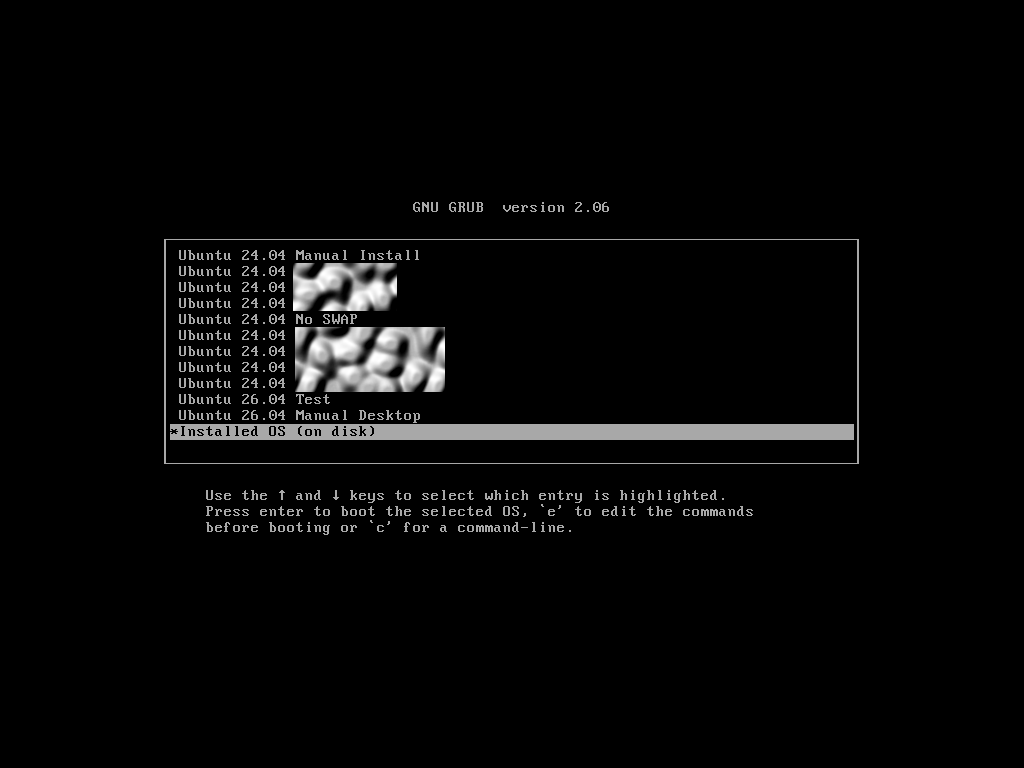
I'll only be providing an example GRUB config here. You'll need to expand it with your own additional options as you move forward in life and need more "loadout" options for Subiquity.
default=installed_os
timeout=30
timeout_style=menu
menuentry "Ubuntu 26.04 Manual Install" --id=26_manual {
  echo "Loading Kernel..."
  linux /isos/26.04/casper/vmlinuz ip=dhcp url=http://FILESERVER_ADDRESS/isos/26.04/server-amd64.iso root=/dev/ram0 cloud-config-url=/dev/null
  echo "Loading Ram Disk..."
  initrd /isos/26.04/casper/initrd
}
menuentry "Ubuntu 26.04 Auto" --id=26_auto {
  echo "Loading Kernel..."
  linux /isos/26.04/casper/vmlinuz ip=dhcp url=http://FILESERVER_ADDRESS/isos/26.04/server-amd64.iso root=/dev/ram0 cloud-config-url=/dev/null autoinstall ds="nocloud-net;s=http://FILESERVER_ADDRESS/isos/26.04/conf/default/"
  echo "Loading Ram Disk..."
  initrd /isos/26.04/casper/initrd
}
menuentry 'Installed OS (on disk)' --id=installed_os {
        exit 1
}
Since I keep the PXE as the default boot option on my systems, I have a 30 second timeout with a default option to boot the on-disk OS. This is very important. If you keep PXE as your default and your GRUB menu defaults to re-installing the OS, you'll wipe out your entire system with a fresh install on every reboot. Perhaps this is a desireable situation for you. It is not a desireable situaiton for me, especially because I would wind up in a rebuild boot loop! I got the GRUB item (installed_os) from the default grub.cfg that ships with the Ubuntu ISO. The GRUB command exit 1 just exits with an error, which tells the system's BIOS that it should continue with the next item in the boot order. Hopefully this is the already-installed OS.
The other two menu entries (26_manual and 26_auto) are the ones that, as the names would imply, allow you to manually or automatically install Ubuntu over the network. Both menu entries have:
- A path to the kernel and initrd. This is the TFTP path under the /var/pxe/ root. GRUB retrieves these when you select the menuentry.
- Some helpful stdout messages
- Some helpful stdout messages
The Linux kernel commandline has all of the information that we need to pass to Subiquity and the initrd. Readers might find it interesting that this information is provided on the kernel's commandline, but the kernel does nothing with this information. In reality, putting this information here just makes it generally available. Every process on a machine can see the kernel commandline. Check it on your own system by running:
cat /proc/cmdline
It even works if you run it as the nobody user. Putting this information in here is functionally the same as writing it in giant letters on the hill outside of town. The information in this commandline is important and deserves some explanation:
- ip=dhcp: Tells the system to get its IP address over DHCP when it starts up. You could define an explicit configuration in here besides DHCP, but that wouldn't be super useful. This is going to happen on various machines and one static IP address for mutltiple machines doesn't generally work very well.
- url=http://FILESERVER_ADDRESS/isos/26.04/server-amd64.iso: This is the full URL to the ISO that the initrd will download and boot from. This is provided as a full path with protocol because it's HTTP. At this point in the boot process, everything else has been TFTP. You could use HTTPS instead of HTTP here if you have a valid SSL certificate. See above notes for some considerations on that.
- cloud-config-url=/dev/null: Necessary in order to speed up your boots. Without this, the ISO will re-download and re-write itself in RAM. I haven't spent the time to fully understand why this happens, but it does happen. Adding this setting keeps things snappy
- autoinstall: The signifier that Subiquity should try an autoinstall. It will look for relevant files when this setting is set. If the files are not found, Subiquity will fall back to a manual install.
- ds=: Short for "datasource". Actually comes from cloud-init,
another Canonical project that Subiquity kind
of uses for Subiquity.
- nocloud-net: One of the two "nocloud" options for cloud-init. This portion of the stack was designed for people auto-creating machines in public cloud providers. Subiquity sees this and knows that it must look at the network to find its configuration files.
- s=http://FILESERVER_ADDRESS/isos/26.04/conf/default/: Stands for "seedfrom". This is the URL to the directory that Subiquity will look inside of for its data files. If it doesn't find them here (or if they are malformed YAML), then Subiquity will just drop into the manual installer.
Why Subiquity could not simply gather infer "nocloud-net" from the subsequent "seedfrom" is beyond my comprehension. None of the other datasources appear to use "s" or "seedfrom" as a key for anything. Some people think that "seedfrom" is inherited by some older Debian project, but in fact it is originally from cloud-init back in 2010. Canonical's industry influence with cloud-init has been so wildly successful that it makes all of their other NIH stuff make some sense. The man who never fails is the man who never tries.
A Brief Note On Subiquity's Files
In the NoCloud documentation, it is specified that you need to have two files:
- /user-data
- /meta-data
The user-data file is the important one. That is where all of your configuration settings go. That is the file where all of your hard work will be deposited and then turned into autobuilt machines. The meta-data file needs to exist, and it needs to have one line in it:
instance-id: AnythingYouWant
You can set the instance-id to any string. You can put whatever you want here, it doesn't effect the final built system at all. However, it does need to be set. The above-linked NoCloud documentation does say that you can set the instance-id from the kernel commandline. If you set it there instead of in the meta-data file, your meta-data file still needs to exist, though it can be empty. If the meta-data does not exist, Subiquity will drop you into the manual installer.
Additionally, there are two more helpful files that are not mentioned in any documentation that I can find. If these two files exist, they will speed up your Subiquity starting by about 15 seconds. If they don't exist, then systemd will pause on a start job for cloud-init-network.service. The files in question are:
- /network-config
- /vendor-data
Having these files exist (but empty) will speed up your ISO boot slightly. The user-data file is where all of your important bits will go, but we'll cover writing that file in more detail later.
Network Method File Tree
The above instructions should wind up giving you a file server running both TFTP and HTTP on the same /var/pxe/ directory with these files inside:
/var/pxe
|-- grub
|   |-- grub.cfg
|   |-- grub_i386.pxe
|   |-- grub_x64.pxe
|   |-- i386-pc
|   |   `-- 303 libraries
|   `-- x86_64-efi
|       `-- 282 libraries
|-- isos
|   `-- 26.04
|       |-- casper
|       |   |-- initrd
|       |   `-- vmlinuz
|       |-- conf
|       |   `-- default
|       |       |-- meta-data
|       |       |-- network-config
|       |       |-- user-data
|       |       `-- vendor-data
|       `-- ubuntu-26.04-live-server-amd64.iso
When you want to add a new autobuild configuration to your toolkit, you'll create another directory at the same level of default, copy the configs, edit user-data, and add an entry to grub.cfg.
Editing The ISO / Flash Drive Method
Someetimes it is not desireable or practical to do all of the above over the network. It requires a lot of infrastructure setup that maybe you don't have or don't want to run. Maybe your system doesn't support PXE booting. Maybe it's a piece of ancient Dell hardware that has been off of support longer than you've been a legal adult and it picks a random VLAN to send the DHCP handshake every time the PXE ROM starts up. Maybe you're doing a bunch of workstations at an installation party. Regardless of the reason, you can package everything that you need to autoinstall a system into one ISO.
I used to have very long and wordy instructions on unzipping the ISO, unsquashing filesystems, updating checksums, resquashing filesystems, and using xorriso to recreate the ISO. This was error-prone, broke some features, and was overall a headache that I dreaded doing. Recently, I found out about livefs-editor, which is a tool to do all of that for you.
Installation of this tool on Ubuntu would sensibly be a Snap or an Apt package, but that's not how it is done. Instead, it's just distributed as some Python code. First, install the dependencies:
sudo apt install xorriso squashfs-tools gpg python3-debian liblz4-tool
Then clone the git repo and install it:
git clone https://github.com/mwhudson/livefs-editor.git
cd livefs-editor
pip install --break-system-packages .
Or, if you don't want to "break" your system packages (this one poses no problem since there is no module name overlap), you can do this within a venv. The tool does need to be launched by the root user, though. You have to either run with sudo or from a root shell. It is not designed to be operated by a regular non-privileged user.
Following the above steps will put the command livefs-edit in your $PATH. Using this tool (written by mwhudson on Canonical's time but not considered "Canonical product") is pretty straighforward and easy. This workflow also allows you to more-rapidly test your user-data file on, for example, a VM on your workstation instead of on a beefy server. To bundle your user-data file into the ISO, you just do:
livefs-edit server-amd64.iso my_custom.iso --add-autoinstall-config ./user-data
And the tool will take care of everything for you. The resulting my_custom.iso can be booted on a machine or VM to autoinstall Ubuntu. This ISO won't be UEFI Secure Boot signed. If you have a hard requirement for Secure Booting the live ISO and you can't sign it yourself and add your own signature to your keyring, then you won't be able to do auto-installs.
This tool is capable of a lot more than just bundling the user-data file. You can place in arbitrary files, replace the kernel, inject snaps, change kernel commandline arguments, add packages to the pool on the ISO (so that you don't have to download them from the Internet for every build), install packages to the installer environment itself (useful if you commonly need special packages for troubleshooting failed builds), and more! Full instructions are in the readme, but I'll show you a few cool things that you can do here.
You can bundle all of your changes into a YAML file so that you don't need to stipulate them on the commandline every time. For example, the previous livefs-edit command could instead be done as:
edit.yaml
 - name: add-autoinstall-config
   autoinstall_config: ./user-data
And the command:
livefs-edit live_server.iso my_autobuild.iso --action-yaml edit.yaml
Note that when bundling it into the ISO, only the user-data file is necessary. You don't have to add the meta-data file or any of the other optional-but-helpful files discussed earlier for the network installation path.
Installing Packages To The Installer
The documentation mentions two functions for this:
- install-debs: takes a list of deb files to install to the installer itself
- install-packages: also claims to take a list of deb files to install to the installer itself
This is confusing because the documentation says that both functions od the same thing. However, the documentation is wrong. The install-debs does what it says on the box. The install-packages downloads the packages from the default apt repos and installs them. It does not take a list of debs as it claims, but a list of repository package names. To highlight the difference between these, look at these two example files:
install-debs.yaml
- name: install-debs
  debs:
    - neovim.deb
install-packages.yaml
- name: install-packages
  packages:
    - neovim
In the first example above, the tool will look for the neovim.deb file in the current working directory and install it to the base layer of the live environment. In the second example, the tool will download and install the package named "neovim" from the repositories.
NB: The official documentation on livefs-edit is missing information here. In order to know that you need a "debs" key with a value of a list, you need to either read this blogpost or the source code.
In both of the above examples, a new text editor will be available from the live environment's shell:
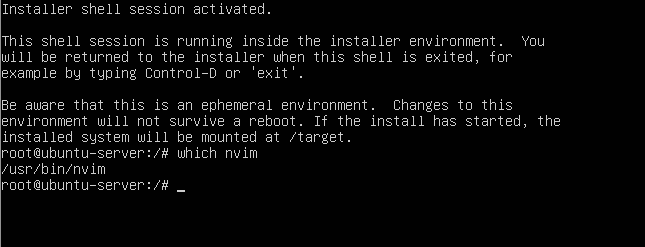
This is supremely useful for installing extra troubleshooting or diagnostic tools. It's also useful for noticing strange things about life. For example, the desktop installer is 6GiB while the server installer is 3 GiB, but if you add the "ubuntu-desktop" package to the installer, it is only 4.8 GiB. It really makes you wonder what the extra 1.2 GiB is in the desktop installer.
Installing Packages To The Pool
Sometimes you want to install a package to the final-built server, but you don't necessarily need it to be available in the live environment. For this, you can reach out to grab it over the network in Subiquity's user-data file, but this relies on the global Internet being reliable (haha).
Instead of relying on that for every build, you can just pull the packages down once and put them into the installer's pool. The tool provides a add-debs-to-pool and add-packages-to-pool identical to the above install option. They have the same required arguments (and are similarly unclear in the documentation). Take for example this livefs-edit YAML file:
- name: add-packages-to-pool
  packages:
    - neovim
    - netcat-openbsd
    - tcpdump
    - nethogs
    - git
    - nmap
    - unzip
    - htop
    - iotop
- name: add-autoinstall-config
  autoinstall_config: user-data
The packages listed will be downloaded and placed into the ISO, but they won't be installed on the ISO. However, you can install them from within the user-data file and avoid needing to run out to the Internet to get them each time. This is the workflow that I use for system provisioning, since you can just install whatever you want this way and it even works on an airgapped machine.
This does in fact download the dependencies for you as well, which is quite helpful. You don't have to manually list all of the dependencies for each package.
Setting Kernel Paremeters
I don't like the new style "consistent" network device names. Back in my day, we had eth0 and we liked it. We didn't have this newfangled "wlp1s0" garbage.
"Yes, please direct my packets out of the interface enxf8e43b5d4a62" said no one ever.
To get the old names back in your installer ISO (and persist this change through to the final installed system), you can use this livefs-edit YAML file:
- name: add-cmdline-arg
  arg: net.ifnames=0 biosdevname=0
  persist: true
Exploring The ISO
You can launch an interactive shell to explore the installer ISO, make manual changes, and bundle everything up. This is really cool and super easy to do:
livefs-edit live_server.iso my_autobuild.iso --mount-all-squashfses --shell
This will put you in a temp directory with two subdirs, new and old. The old directory is the current ISO, and the new directory represents what ISO will be bundled up. You can use this to modify the grub.cfg file or really do anything you want.
Configuring Subiquity
There are a lot of options for Subiquity's user-data file. There is a "full" (not actually full) reference list available on github. The configurations supported by Subiquity are (mostly) a superset of curtin's options. If you are looking for lots of details, these two previous links are where you will find them. Sometimes the details are wrong. You just have to try stuff out and see what fails. This is time-consuming. The iterative troubleshooting process is slow with Subiquity because it relies on restarting and rebuilding from scratch every time you make a change.
There are enough options for the user-data file to make your head spin. Really it is unpleasant to think about manually writing them all yourself. Luckily you don't have to because I have a minimum viable autoinstall config for you right here:
#cloud-config
autoinstall:
  version: 1
  identity:
    hostname: foobar
    password: $6$damnsonwheredyou$fKvhrquSvOwTkywG83u1vp11m.o/pcAmuBnIn8wEv3esInz.0gHjsY6QQ7yXhG4w6OTgyT6dw0HKjB3t0kpG./
    username: beeper
  ssh:
    install-server: true
  storage:
    layout:
      name: lvm
      sizing-policy: all
With this above config, you'll get an auto-build system with the following config:
- A hostname of "foobar"
- A admin user of "beeper" and a password of "punkto.org"
- An SSH server that allows password-powered logins
- One giant root partition inside of LVM on the largest available disk
Modifying these settings and adding additional ones is a lot easier than writing everything from scratch. The first two lines are required by Subiquity, but the rest of it can be customized to your liking!
The "identity" Section
This is where hostname, password, and username get set. What you see above is the minimum viable configuration. There has to be a hostname, since leaving it blank will result in Subiquity crashing. The username must be declared here, and the password has to be hashed according to the documentation. It even goes on to give you some helpful pointers on generating the password:
Several tools can generate the encrypted password, such as "mkpasswd" from the "whois" package, or "openssl passwd".
However, be wary about using openssl passwd to generate
your hashed password here. By default, that command will generate a
basic md5-hashed password. This is widely regarded as insufficiently
secure for passwords. You can see this yourself by running it and
looking at the $1 in the output:
$ openssl passwd
Password:
Verifying - Password:
$1$HcfdSbvk$luLropFPWBMsq9IWWJ5Le1
Running mkpasswd is better in that it produces a $y yescrypt password. However, it only prompts for the password once, so if you mistype it that one time you'll never know that you did that:
$ mkpasswd
Password:
$y$j9T$e2MJorciFJq/vF8iGzVae1$IZypHYTG2LmMPUjOw1cOtcWAOdWe40ooSbgsUhr61E0
I prefer instead to run a slightly modified version of the
above-mentioned openssl command. I provide the password on
the commandline so that I can see it with my eyeballs and know that I
typed it right. You might see this and cringe, thinking that the
password is going to end up in your bash history and show up on your
terminal when you are reverse-searching during a screensharing session
or something. However, you do not need to fear this fate if you simply
preceed the command with a space. Prepending the command with a space
will cause it not to be saved into your bash history on the default
Ubuntu config. To enable this setting in a non-default or non-Ubuntu
system, set the $HISTCONTROL environment variable to
ignoredups:ignorespace. This will cause Bash's history
to ignore both duplicated commands and commands that start with a
spacebar. Now you can safely type passwords directly into the prompt
without fear!
$ openssl passwd -salt damnsonwheredyoufindthis -6 punkto.org
$6$damnsonwheredyou$fKvhrquSvOwTkywG83u1vp11m.o/pcAmuBnIn8wEv3esInz.0gHjsY6QQ7yXhG4w6OTgyT6dw0HKjB3t0kpG./
I'm using $6 (SHA-512) because openssl doesn't support yescrypt and it's good enough.
The idenitty section is also where you set your hostname. This is an interesting point and I think there's a bit of a design deficiency in Subiquity here. The hostname for the machine is in the user-data file. I don't want to rewrite the user-data file for every single host, but I want my hosts to have different hostnames. Subiquity does not support this use-case. I find this puzzling because it seems to me that this use-case should be unbelievably common.
There used to be a hidden undocumented feature where you could set the hostname to "localhost" here and then the hostname would just get pulled over DHCP on each subsequent boot, but Canonical removed this functionality many years ago. It might not have been an intentional feature removal, but instead a side-effect of a systemd-networkd change. Since it wasn't an official feature anyways, there has never been any sort of comment about it (except when I talk about it). Now if you put "localhost" in there, you'll just wind up with all of your machines being named "localhost", which is super unhelpful.
To alleviate this issue, I personally like to set the hostname to
some garbage (like "foobar" above) and then explicitly set the hostname
later on, in the late-commands section. We'll cover that
more later.
You can set additional info in this section as well. You can set your realname and provide a list of groups to be a member of. I assume that at some point in the future, you'll be able to set your birthdate. It'll probably even be enforced for Brazilians and Californians. Here's an example of this segment that makes full use of its possibilities:
  identity:
    hostname: foobar
    password: $6$damnsonwheredyou$fKvhrquSvOwTkywG83u1vp11m.o/pcAmuBnIn8wEv3esInz.0gHjsY6QQ7yXhG4w6OTgyT6dw0HKjB3t0kpG./
    username: beeper
    realname: Beep Beep
    groups: [adm, lpadmin, wireshark, video, sudo, cdrom, docker, libvirt, users]
The "ssh" Section
You don't strictly need this section, but if you don't have it then Subiquity won't install the SSH daemon on your machine. You can give this segment a list of authorized-keys that will wind up being allowed for the user that you configure in the "identity" section.
By default, this section lets password-powered logins get you into the machine. However, if you configure the authorized keys for SSH login, then password login is automatically disabled unless you explicitly enable it with allow-pw. A fully utilized "ssh" section looks something like this:
  ssh:
    install-server: true
    allow-pw: true
    authorized-keys:
      - ssh-ed25519 AAAAC3NzaC1lZDIwoahacantshowthatonachristianmangawebsiteSxB6FRUaBNMq
And that's all of the customization that is applicable to the ssh
section. The installer doesn't support additional sshd configuration
settings here, but you can do more later on in the
late-commands section. Again, we'll get to that later.
There is one more section in the above-provided minimal config, the "storage" section. This section can be as simple and straightforward as above, but it can also be much more complicated. That will be the last section that we'll cover. For now, let's focus on some of the other optional sections that you could configure.
The "keyboard" Section
As the name implies, this is where you set your keyboard layout. This is the default configuration that gets auto-populated if you don't specify anything:
  keyboard:
    layout: 'us'
    variant: ''
    toggle: null
If you are using a regular American English keyboard, then you don't need to change this at all. If, however, you are using a different keyboard (or a different keyboard layout), then this is the setting for you. Personally, I use a non-standard keyboard layout so that I can type characters like €, Ĉ, Ñ, ™, and Þ without needing to open a menu or remember unicode values. These are all (except the € Euro symbol) characters that I use with some regularity for typing people's names, typing in other languages, or adding extra tone™ to my writings.
Changing your layout and variant, however, requires you to know what the short code of the layout that you want is. You might already know this, but you might not. You especially might not know what the short code is if you've only ever selected a verbose name from a drop-down list before.
You can get the current layout on an existing system by looking at
the file /etc/default/keyboard. For me, this would change
my Subiquity keyboard section to:
  keyboard:
    layout: 'us'
    variant: 'intl'
    toggle: null
If you don't currently have a Linux system with these settings set
how you like them, you can take a look at the file
/usr/share/X11/xkb/rules/base.lst to see a full list of
layouts and variants on your system.
If you want to have multiple keyboard layouts that you can switch between, this can be done by simply comma-delimiting the layout and variant values in the keyboard section of the Subiquity config. For example, if you wanted to switch between American English, Latin American Spanish, and Dvorak English, you could configure it like so:
  keyboard:
    layout: 'us,latam,us'
    variant: ',,dvorak'
    toggle: null
The empty two fields in the string for the variant get pointed to the first and second layouts, respecitvely. So in this example, the first US layout has no variant set, but the second US layout has the "dvorak" variant. Shifting between these layouts is done by hitting Alt+Shift.
If you don't like Alt+Shift as a layout switching method, you're in luck. You can change it by setting the toggle value to any of the grp: options listed in the above-mentioned base.lst file. The file itself has a decent explanation of what all the choices are, so you should look there if you want to change this behavior. For example, if you wanted to set this switching behavior to the right-side Windows (Super) key, you would do:
  keyboard:
    layout: 'us,latam,us'
    variant: ',,dvorak'
    toggle: rwin_toggle
These grp: options are the only ones that you can
set at this stage. This is sad because the best XKB option out there,
caps:escape, does not begin with this magic string.
However, we can manually put this in place later on in
late-commands (you may be seeing a trend).
The "snaps" Section
If you're one of those people who likes snaps, you can auto-install with additional snaps pulled in from the Internet. I mostly use snaps for software build tools, so I'm not really sure what the usecase is for doing this here instead of later on in user-space or with config management. If you wanted to, though, you could accomplish this:
  snaps:
    - name: xonotic
    - name: astral-uv
      channel: edge
      classic: true
The above config would install the current version of Xonotic and the
bleeding-edge version of Uv. For "classic" snaps like Uv, you have to
manually set the "classic" key to "true". You can find out if a snap is
a "classic" snap by looking at the final column of
snap list or by looking at the end of the
channels list in snap info astral-uv.
The "apt" & "packages" Sections
The apt section is a doozy. You can do a whole lot in here, so much in fact that there are three separate large pieces of documentation for it (1, 2, 3).
Mirror Selection & Propogation
The most confusing setting in this entire section is the preserve_sources_list setting. It's defined in three different ways across two of the three above pieces of documentation, the third piece of documentation doesn't define it at all. The curtin doc that defines it relies on you knowing whether you are using curtin, cloud-init, or MAAS. This is really confusing because you are using Subiquity, and the Subiquity documentation doesn't mention this key at all.
The preserve_sources_list setting determines whether or not Subiquity will propogate the changes that you make to the and mirrors (via mirror-selection and geoip) into the final installed system or if it will instead only allow them to be present for the installer. It propogates cahnges to the mirrors, not all of the sources that you define. If you define a custom apt source and set preserve_sources_list: false, you will still get your custom apt source in the final installed system! This is very important and not clearly defined in the official documentation.
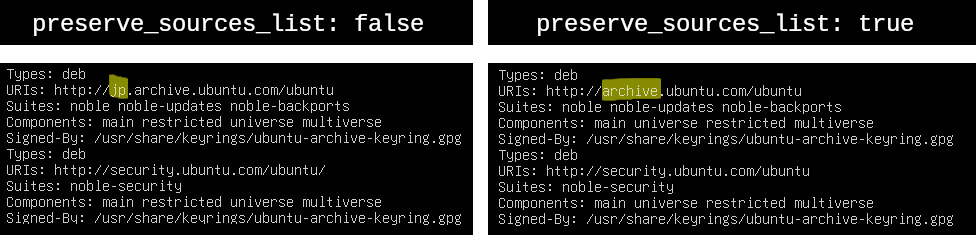
The default is "true", which means that any changes you make to the mirrors will only be changes that effect Subiquity itself, and they won't show up in your final installed system. Take for example this config snippet:
  apt:
    preserve_sources_list: [What do you put here?]
    geoip: false
    mirror-selection:
      primary:
        - uri: "http://jp.archive.ubuntu.com/ubuntu"
This configuration will use the Japanese Ubuntu archives during the initial Subiquity install. What archives are used later, when the system has been built and is in production, depends entirely on what you set preserve_sources_list to:
The two above-mentioned mirror modifications that are effected by the preserve_sources_list key are pretty straightforward. The geoip key determines whether or not your system should use it's geographical information (deduced from public IP address) to choose a country mirror. The mirror-selection key needs a list of mirror URLs under a primary key. There is nothing else under the primary key, but it has to be there for some reason.
If you have both the geoip and mirror-selection keys configured, then Subiquity will favor mirror-selection over your geographic location.
Package & Repository Selection
You can install packages and set up repositories in Subiquity. Take note that even though the sources key is called sources, it is not effected at all under any circumstances by the aforementioned preserve_sources_list.
  apt:
    packages:
      - salt-minion
    sources:
      salt.list:
        source: "deb https://packages.broadcom.com/artifactory/saltproject-deb stable main"
        keyid: 1085 7FFD D3F9 1EAE 577A 21D6 64CB BC81 73D7 6B3F
      mozilla.list:
        source: "ppa:mozillateam/ppa"
The above will set up Broadcom's Salt repository, install the latest salt-minion package, and also set up the Mozilla Team PPA so that you can install Firefox from apt and avoid the slow launch times of the snap version. GPG keys are normally needed, but you can skip them when adding a PPA like this. Additionally, adding PPA's ignores the would-be filename of mozilla.list and creates its own.
If you would rather not provide the Key ID for the GPG signing key, you can instead provide the full key as a block. These two configurations are functionally equivalent:
###############
### KEY ID ####
###############
        keyid: 1085 7FFD D3F9 1EAE 577A 21D6 64CB BC81 73D7 6B3F

###############
##### KEY #####
###############
        key: |
            -----BEGIN PGP PUBLIC KEY BLOCK-----
            Version: Hockeypuck 2.2
            Comment: Hostname:

            xsDNBGPazmABDAC6qc2st6/Uh/5AL325OB5+Z1XMFM2HhQNjB/VcYbLvcCx9AXsU
            eaEmNPm6OY3p5+j8omjpXPYSU7DUQ0lIutuAtwkDMROH7uH/r9IY7iu88S6w3q89
            bgbnqhu4mrSik2RNH2NqEiJkylz5rwj4F387y+UGH3aXIGryr+Lux9WxfqoRRX7J
            WCf6KOaduLSp9lF4qdpAb4/Z5yExXtQRA9HULSJZqNVhfhWInTkVPw+vUo/P9AYv
            mJVv6HRNlTb4HCnl6AZGcAYv66J7iWukavmYKxuIbdn4gBJwE0shU9SaP70dh/LT
            WqIUuGRZBVH/LCuVGzglGYDh2iiOvR7YRMKf26/9xlR0SpeU/B1g6tRu3p+7OgjA
            vJFws+bGSPed07asam3mRZ0Y9QLCXMouWhQZQpx7Or1pUl5Wljhe2W84MfW+Ph6T
            yUm/j0yRlZJ750rGfDKA5gKIlTUXr+nTvsK3nnRiHGH2zwrC1BkPG8K6MLRluU/J
            ChgZo72AOpVNq9MAEQEAAc05U2FsdCBQcm9qZWN0IFBhY2thZ2luZyA8c2FsdHBy
            b2plY3QtcGFja2FnaW5nQHZtd2FyZS5jb20+wsESBBMBCAA8FiEEEIV//dP5Hq5X
            eiHWZMu8gXPXaz8FAmPazmACGwMFCwkIBwIDIgIBBhUKCQgLAgQWAgMBAh4HAheA
            AAoJEGTLvIFz12s/yf0L/jyP/LfduA4DwpjKX9Vpk26tgis9Q0I54UerpD5ibpTA
            krzZxK1yFOPddcOjo+Xqg+I8aA+0nJkf+vsfnRgcpLs2qHZkikwZbPduZwkNUHX7
            6YPSXTwyFlzhaRycwPtvBPLFjfmjjjTi/aH4V/frfxfjH/wFvH/xiaiFsYbP3aAP
            sJNTLh3im480ugQ7P54ukdte2QHKsjJ3z4tkjnu1ogc1+ZLCSZVDxfR4gLfE6GsN
            YFNd+LF7+NtAeJRuJceXIisj8mTQYg+esTF9QtWovdg7vHVPz8mmcsrG9shGr+G9
            iwwtCig+hAGtXFAuODRMur9QfPlP6FhJw0FX/36iJ2p6APZB0EGqn7LJ91EyOnWv
            iRimLLvlGFiVB9Xxw1TxnQMNj9jmB1CA4oNqlromO/AA0ryh13TpcIo5gbn6Jcdc
            fD4Rbj5k+2HhJTkQ78GpZ0q95P08XD2dlaM2QxxKQGqADJOdV2VgjB2NDXURkInq
            6pdkcaRgAKme8b+xjCcVjM7AzQRj2s5gAQwAxmgflHInM8oKQnsXezG5etLmaUsS
            EkV5jjQFCShNn9zJEF/PWJk5Df/mbODj02wyc749dSJbRlTY3LgGz1AeywOsM1oQ
            XkhfRZZqMwqvfx8IkEPjMvGIv/UI9pqqg/TY7OiYLEDahYXHJDKmlnmCBlnU96cL
            yh7a/xY3ZC20/JwbFVAFzD4biWOrAm1YPpdKbqCPclpvRP9N6nb6hxvKKmDo7MqS
            uANZMaoqhvnGazt9n435GQkYRvtqmqmOvt8I4oCzV0Y39HfbCHhhy64HSIowKYE7
            YWIujJcfoIDQqq2378T631BxLEUPaoSOV4B8gk/Jbf3KVu4LNqJive7chR8F1C2k
            eeAKpaf2CSAe7OrbAfWysHRZ060bSJzRk3COEACk/UURY+RlIwh+LQxEKb1YQueS
            YGjxIjV1X7ScyOvam5CmqOd4do9psOS7MHcQNeUbhnjm0TyGT9DF8ELoE0NSYa+J
            PvDGHo51M33s31RUO4TtJnU5xSRb2sOKzIuBABEBAAHCwPYEGAEIACAWIQQQhX/9
            0/kerld6IdZky7yBc9drPwUCY9rOYAIbDAAKCRBky7yBc9drP8ctC/9wGi01cBAW
            BPEKEnfrKdvlsaLeRxotriupDqGSWxqVxBVd+n0Xs0zPB/kuZFTkHOHpbAWkhPr+
            hP+RJemxCKMCo7kT2FXVR1OYej8Vh+aYWZ5lw6dJGtgo3Ebib2VSKdasmIOI2CY/
            03G46jv05qK3fP6phz+RaX+9hHgh1XW9kKbdkX5lM9RQSZOof3/67IN8w+euy61O
            UhNcrsDKrp0kZxw3S+b/02oP1qADXHz2BUerkCZa4RVK1pM0UfRUooOHiEdUxKKM
            DE501hwQsMH7WuvlIR8Oc2UGkEtzgukhmhpQPSsVPg54y9US+LkpztM+yq+zRu33
            gAfssli0MvSmkbcTDD22PGbgPMseyYxfw7vuwmjdqvi9Z4jdln2gyZ6sSZdgUMYW
            PGEjZDoMzsZx9Zx6SO9XCS7XgYHVc8/B2LGSxj+rpZ6lBbywH88lNnrm/SpQB74U
            4QVLffuw76FanTH6advqdWIqtlWPoAQcEkKf5CdmfT2ei2wX1QLatTs=
            =4SES
            -----END PGP PUBLIC KEY BLOCK-----
This can be helpful to do when the keyserver is having issues, or when the key that you want isn't on the keyserver.
If you bundled packages into your installer ISO earlier using livefs-edit, then this is the part where you install them (just add them to the list in packages). They'll get pulled from the local ISO in the ramdisk instead of over the Internet.
What are you to do if you want additional package settings, such as setting version pins or allowing custom repositories to be used for unattended upgrades? This isn't documented in any of the documentation outside of the example config file for Curtin, but you can actually do it:
  apt:
    preferences:
      - package: '*'
        pin: release o=LP-PPA-mozillateam
        pin-priority: 1001
      - package: salt-*
        pin: version 3006.23
        pin-priority: 1001
    conf: | # APT config
      APT {
        Unattended-Upgrade{
          Allowed-Origins "LP-PPA-mozillateam:${distro_codename}";
        };
      };
The above snippet will set the pins to require all packages to prefer the Mozilla PPA (overriding the dummy package pointing to the snap in the default repsoitories), allow the Mozilla PPA to be hit by unattended-upgrades.service, and it will pin the Salt Minion at 3006.23 (the last version that still works well after the project has been violated and left for dead by Broadcom).
The acutal config files written to disk on your final system will wind up at:
/etc/apt/preferences.d/90curtin.pref/etc/apt/apt.conf.d/94curtin-config
Fail Safe vs Fail Secure
By default, if you try to run through Subiquity and it can't reach the mirrors that you've got configured (maybe because they are frequently being DDOS'd) then Subiquity will continue through the rest of the install without issue. Maybe you don't want this for some reason, and instead want the installation to stop at that point. Or maybe this sensible default will change at some point in the future. You can expliclty configure it with:
  apt:
    fallback: [abort|offline-install]
These two options do what they say on the box.
The "refresh-installer" & "updates" Sections
If you've been using computers at all for the last ~50 years, you'll know that people hammer on quite a lot about updating software. The Subiquity installer includes the ability to update both itself and all of the packages on your final system before you even boot into it for the first time.
Subiquity's ability to update itself means that you don't have to get a new ISO to get a new version of Subiquity, you can just keep using your original ISO. However, this also means that your Subiquity config that worked fine yesterday will break tomorrow if a new bug is introduced. This has happened to me on numerous occasions. I think that this is the reason that the default behavior is not to update Subiquity. However, should you wish to run a newer version (or even a bleeding-edge version), you can do it pretty simply:
  refresh-installer:
    update: true
    channel: latest/edge
By updating all of the packages (or all security-related packeges) on your final installed system during the build, you don't have to do this when the final system is built. However, if there is any issue with this process, Subiquity will crash and cease the installation. This step actually happens very near the end of the install, so it can be quite frustrating when it happens over and over again. Every time Subiquity crashes at this step (or any step) you have to reboot and try again from the top. Rebooting like is less of an inconvenience if you are doing virtual machines in a datacenter with fast internet. If, however, you are trying to autoinstall Ubuntu on very slow, old hardware (like me) and/or on an ADSL connection (also me), this is a crippling blow. Many things can cause this stage of Subiquity to fail, such as:
- A temporary network issue on your side, such as congestion or a DNS failure
- A regular mirror sync on the package archive, which is frequent but unpredictable
- An archive outage caused by a DDoS, which has been more and more common for Canonical as of late
- A rate limit on the archive caused by too many people globally trying to download packages (how the hell do they even have this turned on?)
All of the above have happened to me. Subiquity is not resilient to this stage failing. A failure here means a failure of the build. Since some of the above issues that could cause this problem are completely outside of your control and impossible to predict ahead of time, every Subiquity build is a gamble. These updates in the installer sometimes also take a very long time to complete.
It would be nice if Canonical gave us the ability to disable these auto-updates, as they already have given us the ability to disable the installer's own updates. However, the official answer to this request is "why would you want to?". If you read the replies to that linked comment, you will see other people with incredibly valid usecases. But as of now, this cannot be disabled.
If you want to explicitly control these updates (or opt to apply all updates instead of just security updates, which is the default), you can do it like this:
updates: [security|all]
Patching Sensible Behavior Into Subiquity
This sub-section is dedicated to Toby Betts.
You can't autoinstall Ubuntu without installing security updates...until now!!!
This functionality has been missing from Subiquity with no reasonable response from mwhudson for 6 years, which is half a dozen years more than is sensible. It's free software, so I'll exercise some praxis and be the change that I want to see in the world. I gave a talk on that once.
I cloned the repo and looked around for the sections that needed modification. Full disclosure: the robot found three of the four sections that needed modification. It could not find the validation schema, I figured that bit out myself. I also wrote all the changes myself after reading and understanding the code. I used the robot to slightly speed up the location of relevant code in an alien codebase.
First, clone the git repo:
git clone https://github.com/canonical/subiquity.git
cd subiquity
Then download this patch file that contains all the changes that you need to add support for a none value to the updates key. This patch was written for Subiquity at this commit. The exact line numbers will certainly change at some point in the future, so if you're following along from an all-chrome world, head's up on that one. The patch won't apply and you'll have to manually edit it.
Once you've got the patch file, you can apply it with:
git apply ~/Downloads/subiquity_no_updates.patch
git commit -a -m "very good changes to make Subiquity better"
You have to commit your changes. This is required for the snap builder to pick them up. You also need to install snapcraft so that you can build the snap. The installer is packaged as a snap instead of a deb because it's Canonical, what did you expect? Additionally, it uses lxc instead of Docker or libvirt or a normal build environment. Canonical also is in charge of lxc. You must be in the lxd group on your local system to be able to build snap packages. If you're not already in the group, this will require adding yourself and then logging out and in. This one-liner should take care of you.
groups | grep lxd > /dev/null || sudo usermod -a -G lxd $(whoami) && echo "log out and in"
If you don't want to or can't log out and in at this time, then you can just switch over to a TTY (Ctrl+Alt+F1 to get there, Ctrl+Alt+F7 to get back) and run the next commands there after logging in and navigating to wherever your Subiquity repo is:
# Install
make install_deps
sudo snap install snapcraft --classic
# Build
snapcraft pack --output no_updates_subiquity.snap
The above commands will produce a timeout error if you are running firewalld on your system. To alleviate this, run the command:
sudo firewall-cmd --zone=trusted --change-interface=lxdbr0
You'll also have another somewhat-related issue if you have Docker running. You can see remediation steps for that here.
Then retry the snapcraft packing command. The snapcraft command will
take a while to run the first time, since it downloads a whole bunch of
stuff. Just give it time. If you want to see how it's going, you can pop
a tail -f onto the latest log file:
tail -f ~/.local/state/snapcraft/log/$(ls -1tr ~/.local/state/snapcraft/log | tail -1)
This will produce a file named no_updates_subiquity.snap in your directory. This is the actual built snap artifact that has the custom changes. If you don't want to build it yourself, you can download a copy of mine here.
Once you've got the custom Subiquity snap, you can use the bundled
script that comes with the subiquity source code (above
git clone), but this is ultimately just a wrapper for the
aforementioned livefs-edit command:
sudo ./scripts/inject-subiquity-snap.sh live_server.iso no_updates_subiquity.snap no_updates_26.04.iso
# OR
sudo livefs-edit live_server.iso no_updates_26.04.iso --inject-snap no_updates_subiquity.snap
Or, if you don't want to do that yourself, you can download my copy of the modified ISO for Ubuntu 26.04 here. I pinky promise never to do anything nasty with the files on these links.
This new ISO can be used either as a starting point for your
livefs-edit workflow or for network booting. To have the
updates disabled, simply set the updates key in the
user-data YAML to none. It's great! You can validate
that the updates didn't install by a few different methods:
- Watch the build output and see that no updates get installed
apt list --upgradable | grep securityafter the final system has been booted into- Just trust me bro
And you'll wind up with a speedier and more resilient Subiquity.
The "storage" section
If you thought the apt section was complicated, you ain't seen nothing yet. This section is one of the required ones. You can't autoinstall your machine without it. It also has the most potentially complicated configuration. The snippet that I provided above is the minimum viable config:
  storage:
    layout:
      name: lvm
      sizing-policy: all
But this isn't really useful. Most server systems don't want to have one giant ext4 root partition in LVM, taking up the largest possible disk. I work with a lot of servers that have storage arrays attached, or super-fast but small NVMe disks. I usually want a separate partition for /var/log to catch anything that escapes logrotate before it fills up the root partition, breaking sssd auth. Sometimes I want to LVM encrypt stuff, or use different filesystems. The "storage" section is capable of accomplishing all of this, but the documentation is kind of overwhelming.
Luckily, you don't have to read the official documentation. Instead, you can run through the installer by hand and manually do the partitioning the way that you want it. Once you've your system booted, there will be a file at /var/log/installer/autoinstall-user-data. This file is generated by Subiquity after a manual installation. It is the user-data file that you would have needed if you wanted to do your manual work as an auto-install.
Take a very reasonable example. You have a system with two disks, one much larger than the other. The large disk should be a big storage device mounted at /local/, but it should be encrypted with LUKS and formatted XFS (to speed up filesystem checking in the event of a power outage). The other, smaller disk, should have the OS installed on it, but with small partitions for /tmp/ and /var/log/. A slightly larger section of the small disk should be configured as the /home/ partition, and all the rest of the space can be used for the root partition. This is not an uncommon setup. The default configuration would not accomplish this, but it would also preclude you from ever being able to do it, since it would install the OS on the larger of the two disks.
To accomplish this type of setup, the manual partitioning screen of Subiquity would look something like this:
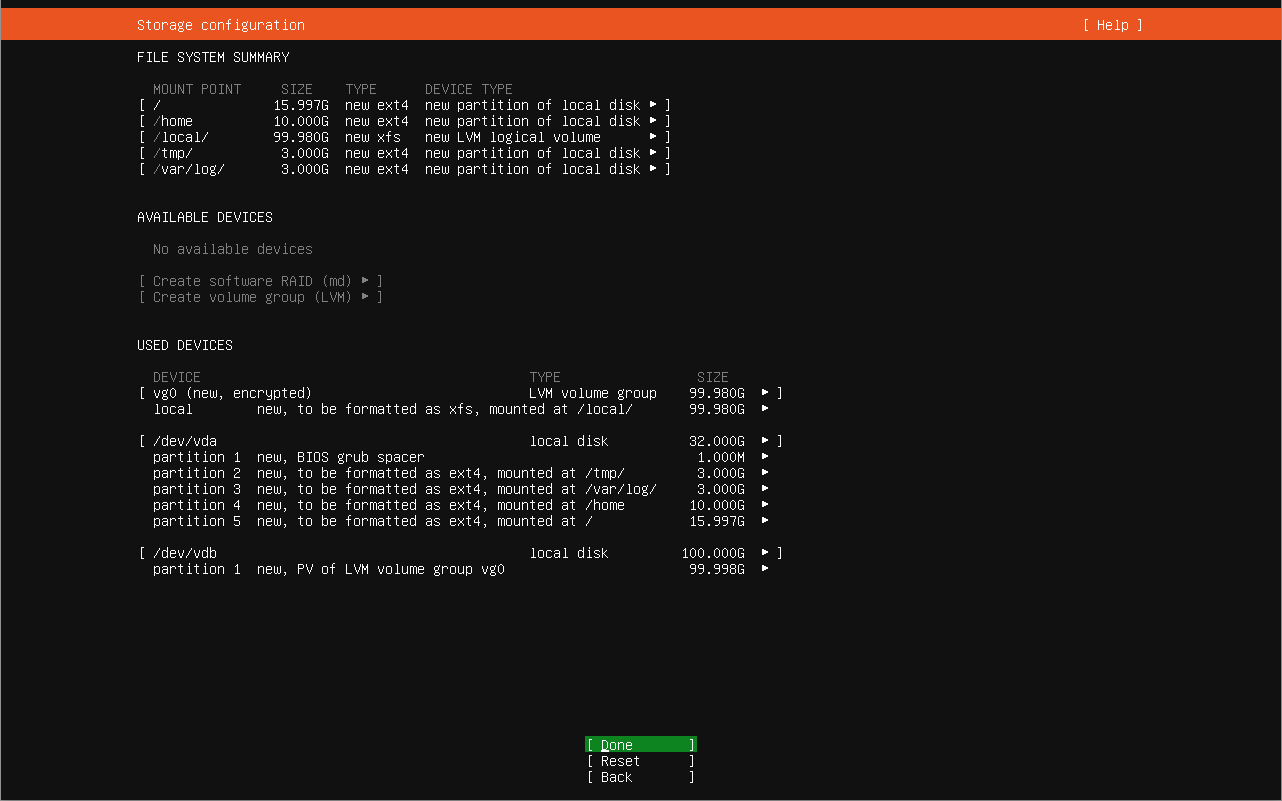
Note: due to disk layout differences between UEFI and BIOS, you will need two different user-data files for the two different types of systems. They will be totally identical except for the beginning part of the storage layout.
In contrast to the 4-line minimum viable config above, this partitioning scheme creates a 143-line long "storage" section. I've placed a copy of this here. Interestingly, if you pull this "storage" section out of this file and plop it into an existing user-data file, it'll fail to install and you'll be sitting there scratching your head.
The first issue with the generated file is the "offset" and "number" values for each item in the list. They're totally unnecessary unless you actually care which sectors your partitions live on and in which order they exist on the physical disk layout. You also don't need the "name: ''" lines in your disk items. You can delete these lines and you've already eliminated almost 10% of the config lines.
I find that the ordering of the values in the list items is quite confusing. The ordering doesn't actually matter. For example, these two items are functionally equivalent in YAML:
- somekey: someval
  anotherkey: anotherval
  foo: bar
- anotherkey: anotherval
  foo: bar
  somekey: someval
Likewise, the ordering in the storage list items doesn't really matter from Subiquity's standpoint, but it does help humans to read and understand the file. I don't like the ordering that Subiquity packages for the user. I think that it's confusing, specifically because Subiquity/Curtin distinguishes these entries by their "type" value. Subiquity puts this information at the bottom of the list item, while I prefer it at the top. So I re-arrange the list item values to accomplish this:
# Before
- ptable: gpt
  path: /dev/vda
  preserve: false
  grub_device: true
  id: disk-vda
  type: disk

# After
- type: disk
  ptable: gpt
  path: /dev/vda
  preserve: false
  grub_device: true
  id: disk-vda
This makes it easier for me to see at a glance what "type" an item is. The hyphen pulls the eye to the most important information that the list item has to offer.
The next issue with the rendered "storage" section is that the different types are all over the place. If you look at the example file above, the mount for the root partition is really far away from the mounts for all the other partitions. This seems like nonsense to me, so I re-arrange the items (whose order doesn't matter to Subiquity) to keep things segregated into chunks. I also add helpful comment blocks to make finding a section even easier for the human eye.
You can see a copy of my example file at this stage here.
Anywhere that you marked in the manual partitioner to use the rest of the available disk space, Subiquity actually looked at how many bytes were left and wrote that number in for you. This makes your config non-portable to systems with even slightly different disk layouts. To remedy this, you can replace any section that has "size: [some huge number]" with "size: -1", which will just use the remaining available space.
Next, your "disk", "partition", "luks", and "lvm_partition" type items will all have a "path" value. It is important to delete these. Selection of disks by path is unreliable. Subiquity can't actually select the partitions, crypts, and logical volumes by path because they don't exist yet (I'm not sure why it puts them in the file). The only items that should have a "path" are the mountpoints, since Subiquity needs to know where to mount them.
Since we've removed the method that Subiquity was using to select your disks (the path), we need to provide it with a different method. Look at this config:
- type: disk
  ptable: gpt
  preserve: false
  grub_device: true
  id: disk-vda
The "id" can be anything that we want, it's just used inside the YAML to reference this item later on. So how is Subiquity supposed to know which disk on your system should get this treatment? The different options for selection are specified in full here in the official docs, but I'll cover them briefly. All of thse go underneath a separate "match" key in the config because they are Subiquity-specific extensions to Curtin's options:
- serial: selects by disk serial number. This would be non-portable, but it does support globbing. If you have a Dell system with a BOSS card, for example, the serial number on that disk will start with the string "DELLBOSS". You can use this "serial: DELLBOSS*" to select this disk consistently across multiple different machines.
- model: same as serial but for disk model number
- vendor: same as serial and model but for disk vendor. Note that some disks (like the NVMe in my laptop) don't report a vendor
- ssd: A true/false option on whether or not the disk is an SSD
- size: You can choose either "largest" or "smallest".
A lot of the selectors above can be acquired by running the command lsblk -o NAME,MODEL,VENDOR,SERIAL
For this example, I'm just going to select the disks via largest/smallest. The above example at this point looks like this:
- type: disk
  ptable: gpt
  preserve: false
  grub_device: true
  id: disk-vda
  match:
    size: smallest
The next piece of information that I think is worth changing in this rendered config snippet is the "id". As I mentioned, this can be anything that we want. The id "disk-vda" in the disk item is just used later on to reference this disk when we are choosing where partitions go. The partitions' ids are used to reference where filesystems should go, etcetera etcetera. Howver, a lot of the ids are not really useful to humans.
- "disk-vda"? Is that the mass storage one or the OS one?
- "partition-2"? This tells me nothing at all about the partition
To figure out what "partition-2" actually is in userspace, I have to search through the file for "partition-2" and find the "format" item that references it. Then I need to look at the id for that format (format-1) and search through the file for that string to find the "mount" item that actually mounts the filesystem. All of this just to figure out what I'm dedicating 3G of space to!
To make future reference of this file easier, I like to change these all to descriptive names. Having a text editor with a find/replace function makes this quite easy, because you can just change the id everywhere that it shows up verbatim.
The final bit of info that needs ot be modified in the above example is the "dm_crypt" item. Right now it looks like:
- type: dm_crypt
  volume: storage-partition
  keyfile: /tmp/luks-key-y3x82gya
  recovery_keyfile: null
  preserve: false
  id: storage-dmcrypt
The problem with this is the keyfile. That's a file that won't exist when you go to run Subiquity. When you typed in the password by hand, Subiquity wrote that into a temp file and referenced that. This way, you didn't have your decryption key sitting in plaintext in a world-readable file on your final installed system. This is a smart choice, but it doesn't help us with writing a portable user-data file. Subiquity gives us two options:
- Set the "key" value to a plaintext version of the decryption key. This means that the key will be stored in plaintext either on your HTTP server or inside the installation ISO.
- Set the "keyfile" value to a filepath containing a plaintext version of the decyryption key.
Neither of these options are really that great. Outside of manually doing the partitioning on every install, I don't know of a way to get Subiquity to automatically do everything but prompt for a desired decryption password. The workflow that I recommend is to use a standard and easily-remembered password here and then change it on first boot. You can change this with the command:
sudo cryptsetup luksChangeKey /dev/path/to/luks_device -S 0
And that's about everything that you need in the storage section. You can see an example of my fully-cleaned-up config here.
Note: My original blogpost on Subiquity included a note that the installer would crash if you tried to configure both a LUKS partition and custom sources. This bug has since been resolved. The original bug report still remains unacknowledged by Canonical, however.
The "late-commands" & "early-commands" Sections
Subiquity can, at times, feel anemic. There are settings that you may
reasonably want to have set during the first boot that Subiquity simply
does not provide you with the facilities to configure. Luckily, you can
run whatever abritrary commands you want at the end of the installation.
You don't even have to type them, you just add them to
late-commands.
Note that, at this stage in the build, your final system is mounted at /target/. The root directory is still your ramdisk. So any modifications that you make need to be made under /target/ if you want to keep them past the reboot.
I mentioned earlier that you can't configure the keyboard to set the XKB option "caps:escape", which makes the caps key into a second escape key. This is really useful for some text editors (look at the buttons at the bottom of this page for a free clue) becuase you don't have to travel your finger so far away. We can use "late-commands" to configure this.
  late-commands:
    - sed -i 's/XKBOPTIONS=""/XKBOPTIONS="caps:escape"/' /target/etc/default/keyboard
You can similarly use sed like this to set your sshd settings.
Subiquity is also missing the very basic feature of being able to set the DHCP hostname statically. My solution to this issue is to create a reverse record for each machine and run this (I'm sure there's a better way to do this. Send me an email and I'll put it in this post):
  late-commands:
    - rm /target/etc/hostname && getent hosts $(ip -o -4 address show scope global | head -n 1 | awk '{print $4}' | awk -F '/' '{print $1}') | awk '{print $2}' | awk -F '.' '{print $1}' > /target/etc/hostname
When Subiquity finishes successfully, it will either poweroff or reboot. There is no option to get a shell on a successful run. To accomplish this (to poke around the installer), I like to add a command with a known-bad exit code to late-commands. This will trick Subiquity into thinking that the build failed and drop you into a rescue shell:
  late-commands:
    - false
The opposite side of "late-commands", which run after Subiquity has finished everything else, are "early-commands", which run before everything else. You can do whatever you like here, but I've found it most useful for setting the live environment users' passwords. There is an sshd running in the live environment and you can SSH into it (which is super helpful), but the passwords are by default set to a random string (which isn't helpful at all). You can set these:
  early-commands:
    - echo "installer:password" | chpasswd
    - echo "ubuntu-server:password" | chpasswd
The "installer" user will present you with a copy of the TTY that the installer is running on. This is great for checking progress or interacting with the emergency shell on a failure.
The "ubuntu-server" user will just give you a bash shell in the live environment whether or not the installer is currently running or has exited with an error.
With this, you can log in to the system from inside your terminal multiplexer instead of needing to stand at a crash cart or have a VNC session running.
Troubleshooting Subiquity
Subiquity is fragile, so you'll wind up staring at the rescue shell with some regularity.
If your user-data file contains a YAML syntax error (such as a tab character or the lack of a colon), then Subiquity will drop you into the manual installer without telling you why. If your user-data file contains a schema error, then you'll get a "Malformed blah blah blah" error and a rescue shell. Since the iterative loop on autobuilding a system is long (boot times for each attempt), this is quite frustrating. Luckily, you can validate your YAML and your schema ahead of time on your local machine using the same script that Subiquity uses to validate it at runtime. Clone the git repository like mentioned above, go into the directory, and then run:
make install_deps
./scripts/validate-autoinstall-user-data.py /path/to/user-data
For any other crashes, you'll likely see a screen that looks something like this:
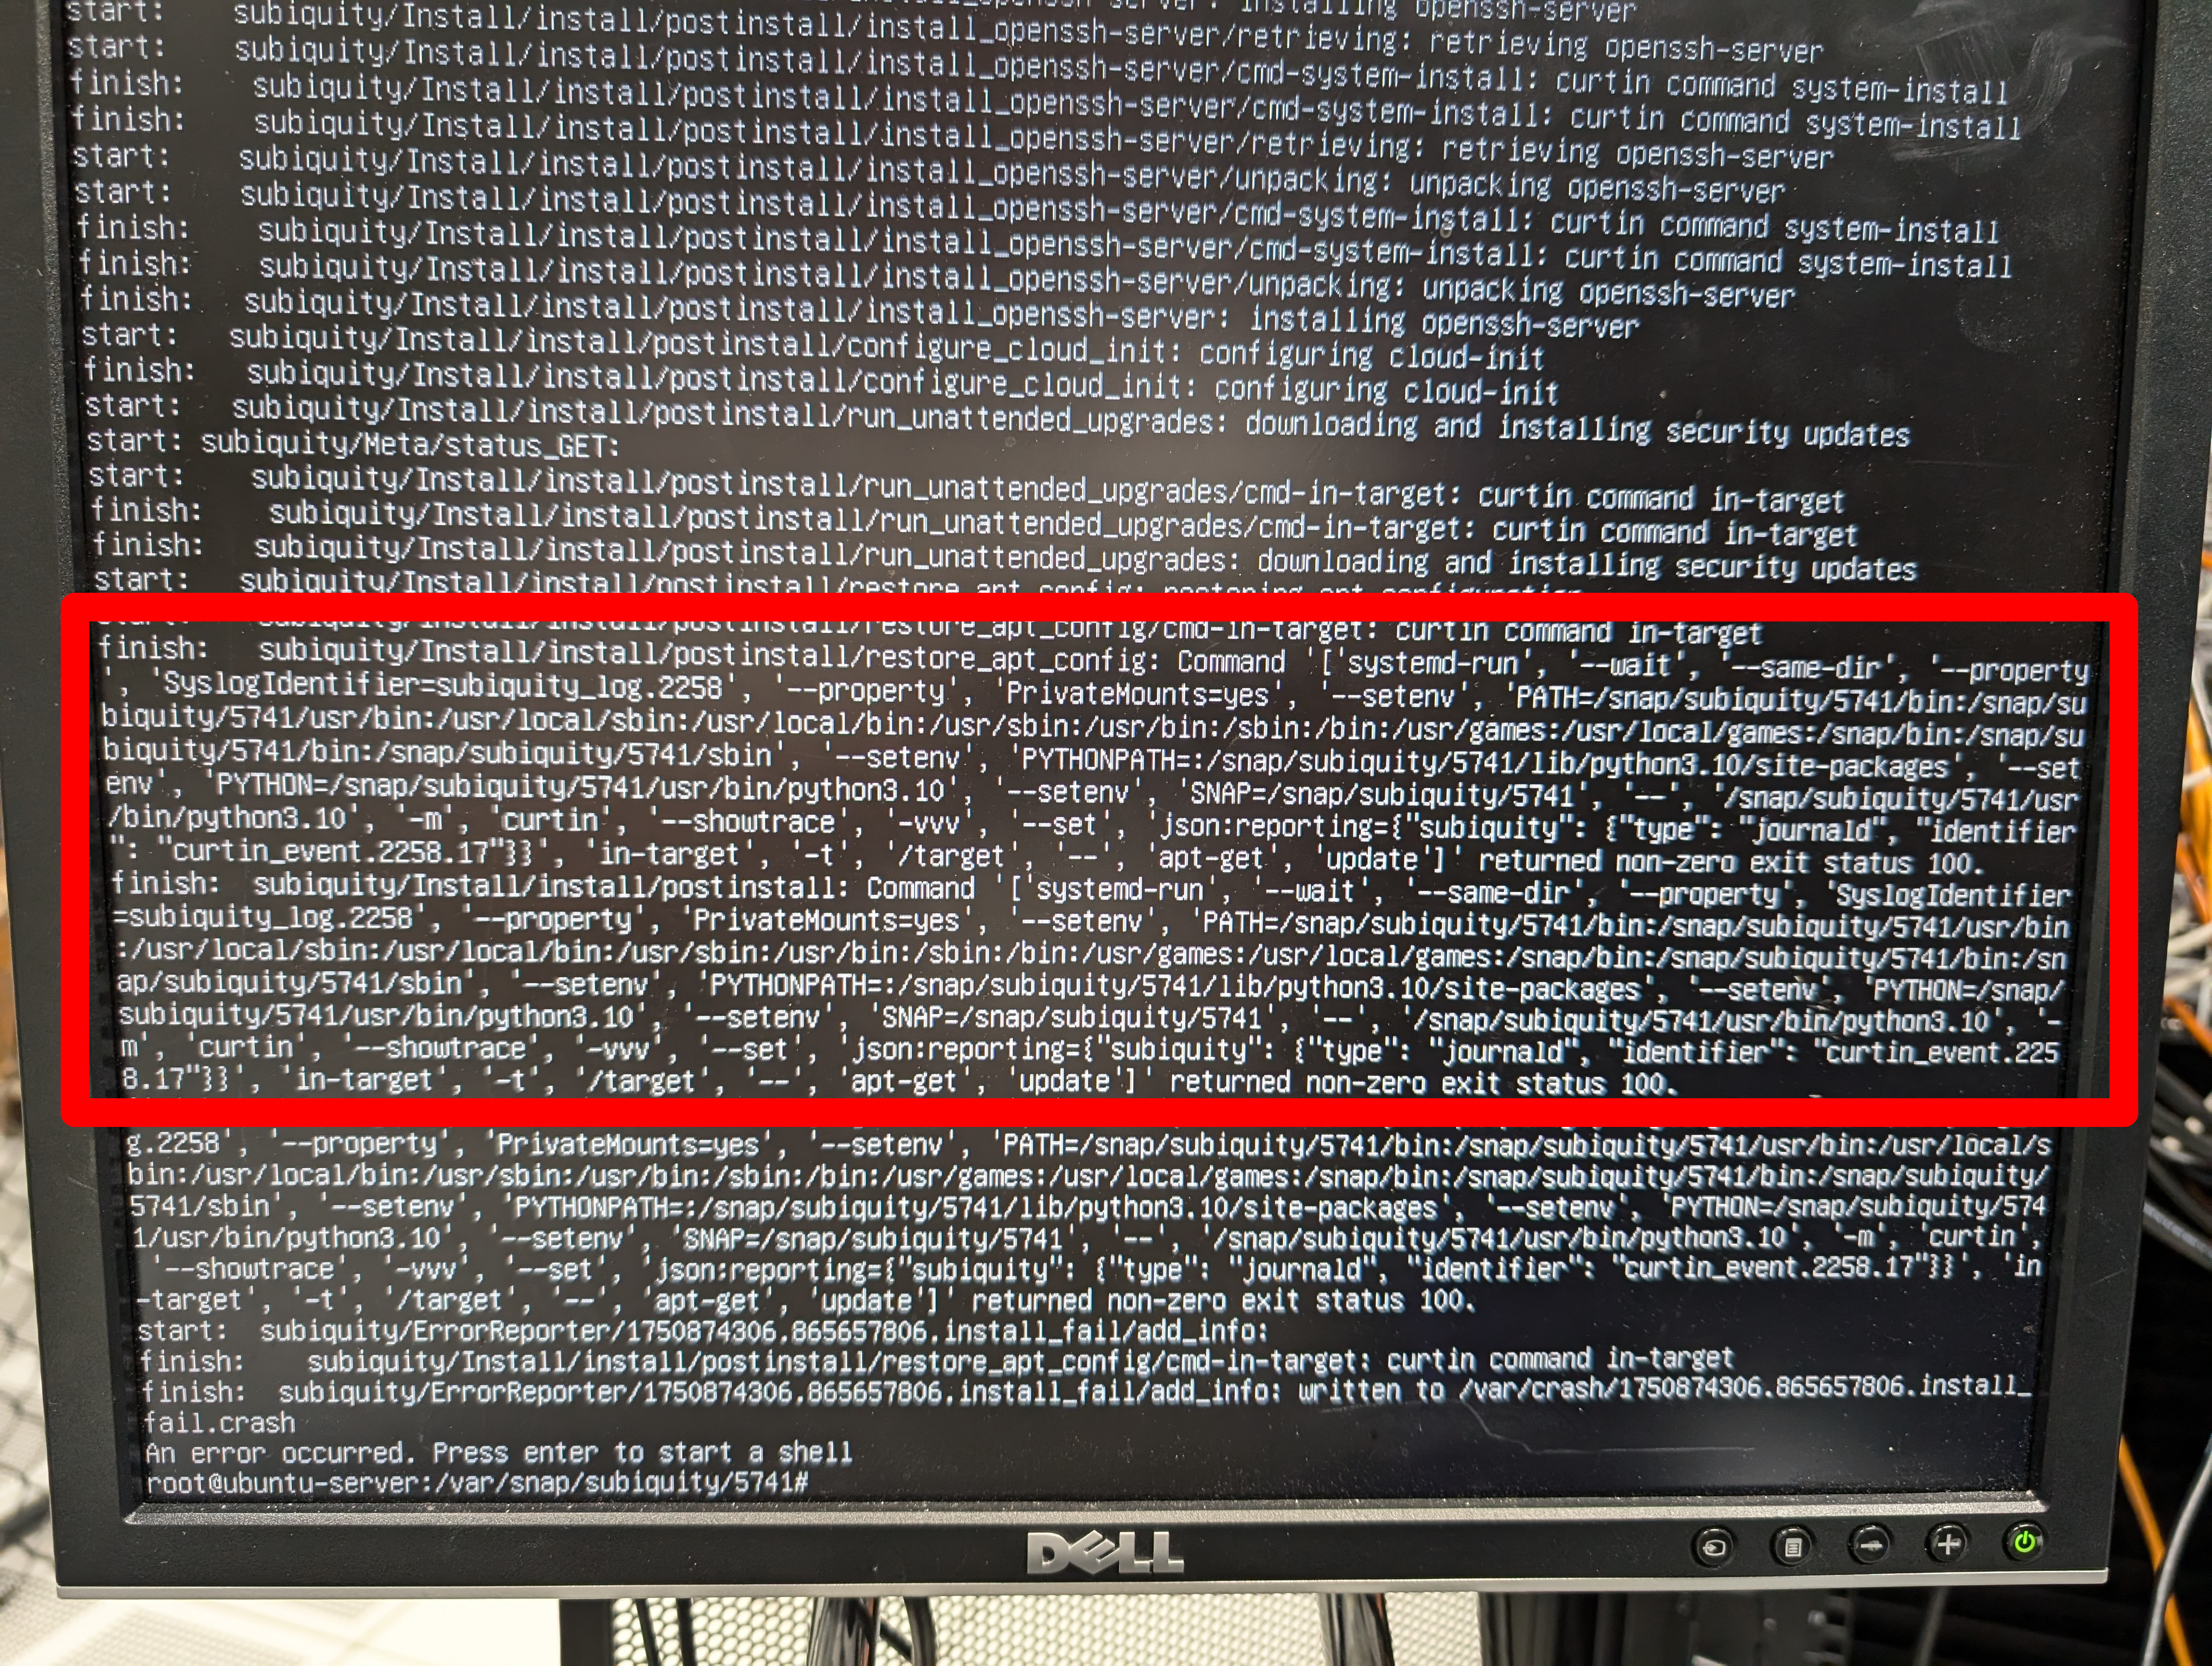
This huge long command is mostly just a bunch of wrapping and environment setting, but the actual meat and potatoes of it boils down (in this example) to:
curtin in-target -t /target -- apt-get update
You can re-run the command and see the error that it produced to get an idea for why things went so terribly wrong. I most frequently see this with the "apt-get update" command, but then when I try to run it by hand, there's no error. For situations like this, you actually have to look into the logs to see the error that the command produced at runtime.
These logs are in /var/crash/. They start off with a full dmesg dump and at the end there's a bunch of stuff that I don't know what it is. Nestled in the middle are the actual Subiquity logs, and with a little bit of less-fu, you can surely find the error.
For the example of the "apt-get update" failing, I've most frequently found this when the remote repository is doing a mirror sync. Again, this is a regular piece of repository maintenance that cannot be predicted, but it still nukes your build. If you find yourself running into this issue, use the custom ISO that I created above and set "updates: none" in your user-data file.
fin.
I have distilled 4+ years of wrangling Subiquity into this writeup. I sincerely hope that somebody somewhere finds this webpage useful someday.